DQN 思维决策 (Tensorflow)
学习资料:
接着上节内容, 我们来定义 DeepQNetwork 的决策和思考部分.
代码主结构 
定义完上次的神经网络部分以后, 这次我们来定义其他部分. 包括:
class DeepQNetwork:
    # 上次的内容
    def _build_net(self):

    # 这次的内容:
    # 初始值
    def __init__(self):

    # 存储记忆
    def store_transition(self, s, a, r, s_):

    # 选行为
    def choose_action(self, observation):

    # 学习
    def learn(self):

    # 看看学习效果 (可选)
    def plot_cost(self):
初始值 
class DeepQNetwork:
    def __init__(
            self,
            n_actions,
            n_features,
            learning_rate=0.01,
            reward_decay=0.9,
            e_greedy=0.9,
            replace_target_iter=300,
            memory_size=500,
            batch_size=32,
            e_greedy_increment=None,
            output_graph=False,
    ):
        self.n_actions = n_actions
        self.n_features = n_features
        self.lr = learning_rate
        self.gamma = reward_decay
        self.epsilon_max = e_greedy     # epsilon 的最大值
        self.replace_target_iter = replace_target_iter  # 更换 target_net 的步数
        self.memory_size = memory_size  # 记忆上限
        self.batch_size = batch_size    # 每次更新时从 memory 里面取多少记忆出来
        self.epsilon_increment = e_greedy_increment # epsilon 的增量
        self.epsilon = 0 if e_greedy_increment is not None else self.epsilon_max # 是否开启探索模式, 并逐步减少探索次数

        # 记录学习次数 (用于判断是否更换 target_net 参数)
        self.learn_step_counter = 0

        # 初始化全 0 记忆 [s, a, r, s_]
        self.memory = np.zeros((self.memory_size, n_features*2+2)) # 和视频中不同, 因为 pandas 运算比较慢, 这里改为直接用 numpy

        # 创建 [target_net, evaluate_net]
        self._build_net()

        # 替换 target net 的参数
        t_params = tf.get_collection('target_net_params')  # 提取 target_net 的参数
        e_params = tf.get_collection('eval_net_params')   # 提取  eval_net 的参数
        self.replace_target_op = [tf.assign(t, e) for t, e in zip(t_params, e_params)] # 更新 target_net 参数

        self.sess = tf.Session()

        # 输出 tensorboard 文件
        if output_graph:
            # $ tensorboard --logdir=logs
            tf.summary.FileWriter("logs/", self.sess.graph)

        self.sess.run(tf.global_variables_initializer())
        self.cost_his = []  # 记录所有 cost 变化, 用于最后 plot 出来观看
存储记忆 
DQN 的精髓部分之一: 记录下所有经历过的步, 这些步可以进行反复的学习, 所以是一种 off-policy 方法, 你甚至可以自己玩, 然后记录下自己玩的经历, 让这个 DQN 学习你是如何通关的.
class DeepQNetwork:
    def __init__(self):
        ...
    def store_transition(self, s, a, r, s_):
        if not hasattr(self, 'memory_counter'):
            self.memory_counter = 0

        # 记录一条 [s, a, r, s_] 记录
        transition = np.hstack((s, [a, r], s_))

        # 总 memory 大小是固定的, 如果超出总大小, 旧 memory 就被新 memory 替换
        index = self.memory_counter % self.memory_size
        self.memory[index, :] = transition # 替换过程

        self.memory_counter += 1
选行为 
和之前的 QLearningTable, SarsaTable 等一样, 都需要一个选行为的功能.
class DeepQNetwork:
    def __init__(self):
        ...
    def store_transition(self, s, a, r, s_):
        ...
    def choose_action(self, observation):
        # 统一 observation 的 shape (1, size_of_observation)
        observation = observation[np.newaxis, :]

        if np.random.uniform() < self.epsilon:
            # 让 eval_net 神经网络生成所有 action 的值, 并选择值最大的 action
            actions_value = self.sess.run(self.q_eval, feed_dict={self.s: observation})
            action = np.argmax(actions_value)
        else:
            action = np.random.randint(0, self.n_actions)   # 随机选择
        return action
学习 
最重要的一步来了, 就是在 DeepQNetwork 中, 是如何学习, 更新参数的. 这里涉及了 target_net 和 eval_net 的交互使用.
class DeepQNetwork:
    def __init__(self):
        ...
    def store_transition(self, s, a, r, s_):
        ...
    def choose_action(self, observation):
        ...
    def _replace_target_params(self):
        ...
    def learn(self):
        # 检查是否替换 target_net 参数
        if self.learn_step_counter % self.replace_target_iter == 0:
            self.sess.run(self.replace_target_op)
            print('\ntarget_params_replaced\n')

        # 从 memory 中随机抽取 batch_size 这么多记忆
        if self.memory_counter > self.memory_size:
            sample_index = np.random.choice(self.memory_size, size=self.batch_size)
        else:
            sample_index = np.random.choice(self.memory_counter, size=self.batch_size)
        batch_memory = self.memory[sample_index, :]

        # 获取 q_next (target_net 产生了 q) 和 q_eval(eval_net 产生的 q)
        q_next, q_eval = self.sess.run(
            [self.q_next, self.q_eval],
            feed_dict={
                self.s_: batch_memory[:, -self.n_features:],
                self.s: batch_memory[:, :self.n_features]
            })

        # 下面这几步十分重要. q_next, q_eval 包含所有 action 的值,
        # 而我们需要的只是已经选择好的 action 的值, 其他的并不需要.
        # 所以我们将其他的 action 值全变成 0, 将用到的 action 误差值 反向传递回去, 作为更新凭据.
        # 这是我们最终要达到的样子, 比如 q_target - q_eval = [1, 0, 0] - [-1, 0, 0] = [2, 0, 0]
        # q_eval = [-1, 0, 0] 表示这一个记忆中有我选用过 action 0, 而 action 0 带来的 Q(s, a0) = -1, 所以其他的 Q(s, a1) = Q(s, a2) = 0.
        # q_target = [1, 0, 0] 表示这个记忆中的 r+gamma*maxQ(s_) = 1, 而且不管在 s_ 上我们取了哪个 action,
        # 我们都需要对应上 q_eval 中的 action 位置, 所以就将 1 放在了 action 0 的位置.

        # 下面也是为了达到上面说的目的, 不过为了更方面让程序运算, 达到目的的过程有点不同.
        # 是将 q_eval 全部赋值给 q_target, 这时 q_target-q_eval 全为 0,
        # 不过 我们再根据 batch_memory 当中的 action 这个 column 来给 q_target 中的对应的 memory-action 位置来修改赋值.
        # 使新的赋值为 reward + gamma * maxQ(s_), 这样 q_target-q_eval 就可以变成我们所需的样子.
        # 具体在下面还有一个举例说明.

        q_target = q_eval.copy()
        batch_index = np.arange(self.batch_size, dtype=np.int32)
        eval_act_index = batch_memory[:, self.n_features].astype(int)
        reward = batch_memory[:, self.n_features + 1]

        q_target[batch_index, eval_act_index] = reward + self.gamma * np.max(q_next, axis=1)

        """
        假如在这个 batch 中, 我们有2个提取的记忆, 根据每个记忆可以生产3个 action 的值:
        q_eval =
        [[1, 2, 3],
         [4, 5, 6]]

        q_target = q_eval =
        [[1, 2, 3],
         [4, 5, 6]]

        然后根据 memory 当中的具体 action 位置来修改 q_target 对应 action 上的值:
        比如在:
            记忆 0 的 q_target 计算值是 -1, 而且我用了 action 0;
            记忆 1 的 q_target 计算值是 -2, 而且我用了 action 2:
        q_target =
        [[-1, 2, 3],
         [4, 5, -2]]

        所以 (q_target - q_eval) 就变成了:
        [[(-1)-(1), 0, 0],
         [0, 0, (-2)-(6)]]

        最后我们将这个 (q_target - q_eval) 当成误差, 反向传递会神经网络.
        所有为 0 的 action 值是当时没有选择的 action, 之前有选择的 action 才有不为0的值.
        我们只反向传递之前选择的 action 的值,
        """

        # 训练 eval_net
        _, self.cost = self.sess.run([self._train_op, self.loss],
                                     feed_dict={self.s: batch_memory[:, :self.n_features],
                                                self.q_target: q_target})
        self.cost_his.append(self.cost) # 记录 cost 误差

        # 逐渐增加 epsilon, 降低行为的随机性
        self.epsilon = self.epsilon + self.epsilon_increment if self.epsilon < self.epsilon_max else self.epsilon_max
        self.learn_step_counter += 1
看学习效果 
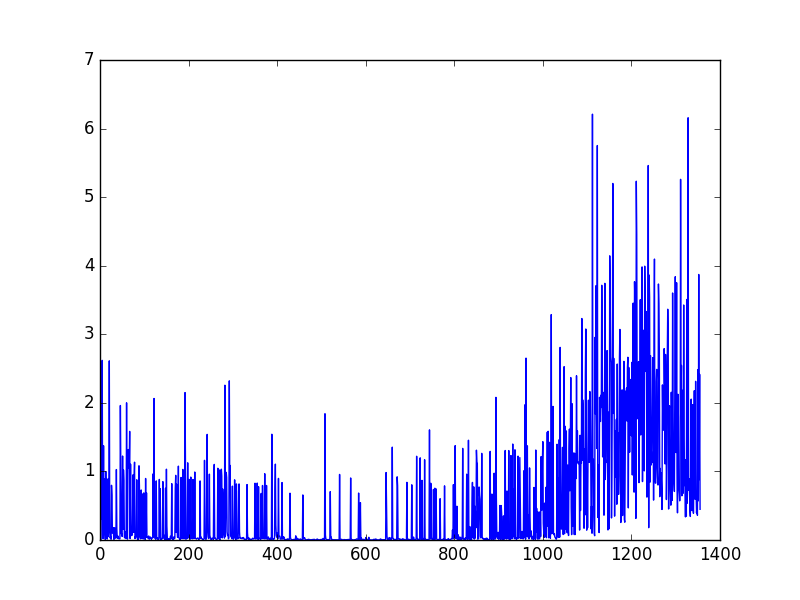
为了看看学习效果, 我们在最后输出学习过程中的 cost 变化曲线.
class DeepQNetwork:
    def __init__(self):
        ...
    def store_transition(self, s, a, r, s_):
        ...
    def choose_action(self, observation):
        ...
    def _replace_target_params(self):
        ...
    def learn(self):
        ...
    def plot_cost(self):
        import matplotlib.pyplot as plt
        plt.plot(np.arange(len(self.cost_his)), self.cost_his)
        plt.ylabel('Cost')
        plt.xlabel('training steps')
        plt.show()
可以看出曲线并不是平滑下降的, 这是因为 DQN 中的 input 数据是一步步改变的, 而且会根据学习情况, 获取到不同的数据. 所以这并不像一般的监督学习, DQN 的 cost 曲线就有所不同了.
如果想一次性看到全部代码, 请去我的 Github
修改版的 DQN 
最后提供一种修改版的 DQN 代码,
这是录制完视频以后做的, 这是将 q_target 的计算也加在了 Tensorflow 的 graph 里面.
这种结构还是有好处的, 作为学习样本的话, 计算结构全部在 tensorboard 上, 就更好理解, 代码结构也更好理解.
我只在原本的 DQN 代码上改了一点点东西, 大家应该可以很容易辨别. 修改版的代码在这.
分享到:
![]()
![]()
![]()
![]()
如果你觉得这篇文章或视频对你的学习很有帮助, 请你也分享它, 让它能再次帮助到更多的需要学习的人.
莫烦没有正式的经济来源, 如果你也想支持 莫烦Python 并看到更好的教学内容, 赞助他一点点, 作为鼓励他继续开源的动力.

